Projectroles Usage
This document provides instructions for using the projectroles app which has
been integrated into your Django site.
Hint
Detailed instructions for many pages can be found in an interactive tour by clicking the “Help” link in the right side of the top navigation bar.
Before reading this document, be sure to see Projectroles Basics for basic concepts regarding the use of this app.
Logging In
Unless anonymous access is specifically set on the site, apart from specific public or token-enabled views, user login is mandatory for using a SODAR Core based Django site.
One can either log in using a local Django user or, if LDAP/AD is enabled, their
LDAP/AD credentials from a supported site. In the latter case, the user domain
must be appended to the user name in form of user@DOMAIN.
If OpenID Connect (OIDC) single-sign on authentication is enabled, an extra login element will be displayed next to the standard login controls. This will take the user to the login view of the OIDC provider. The element can be replaced with a custom template to e.g. use specific graphics recommended by the provider.

SODAR Core login form
User Interface
Basics
Upon logging into a SODAR Core based Django site using default templates and CSS, the general view of your site is split into the following elements:
Top navigation bar: Contains the site logo and title, search element, link to advanced search, help link and the user dropdown.
User dropdown: Contains links to user management, admin site and site-wide apps the user has access to.
Project sidebar: Shortcuts to project apps and project management pages
Project navigation: Project structure breadcrumb (disabled for site apps)
Content: Actual app content goes in this element
Footer: Optional footer with e.g. site info and version
Home view
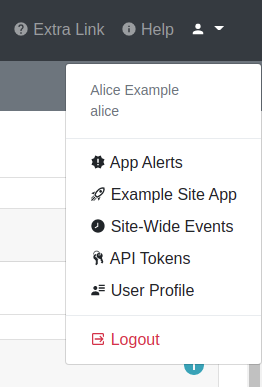
User dropdown
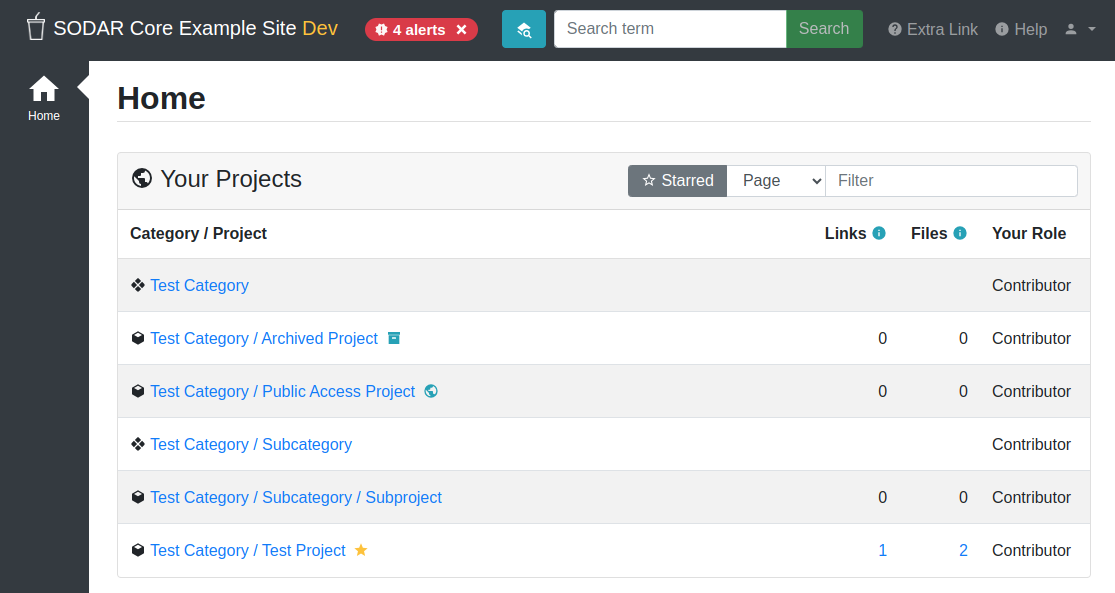
Home View
As content within a SODAR Core based site is by default sorted into projects, the home view displays a tree view of categories and projects to choose from. You can filter the list with a search term or restrict display to your starred projects.
Hint
If you have been granted a finder role to a category, projects under it will be visible in the list as grayed out text instead of links. You can navigate to the parent category and see the member roles there in order to request access to a project from an owner or delegate.
Project Detail View
The project detail page dynamically imports elements from installed project apps, usually showing e.g. overview of latest additions to app data, statistics and/or shortcuts to app functionalities. Here you can also access project apps from the project sidebar. For project apps, the sidebar link leads to the app entry point view as defined in the app plugin.
For categories, the view also displays the Category Statistics card. This card contains statistics from site apps regarding data in projects within the category and its possible subcategories.
For each page in a project app which extends the default projectroles template layout, the project title bar is displayed on the top of the page. This contains the project title and description and a link to “star” the project into your favourites. Below this, the project app title bar with possible app-specific controls is usually displayed.
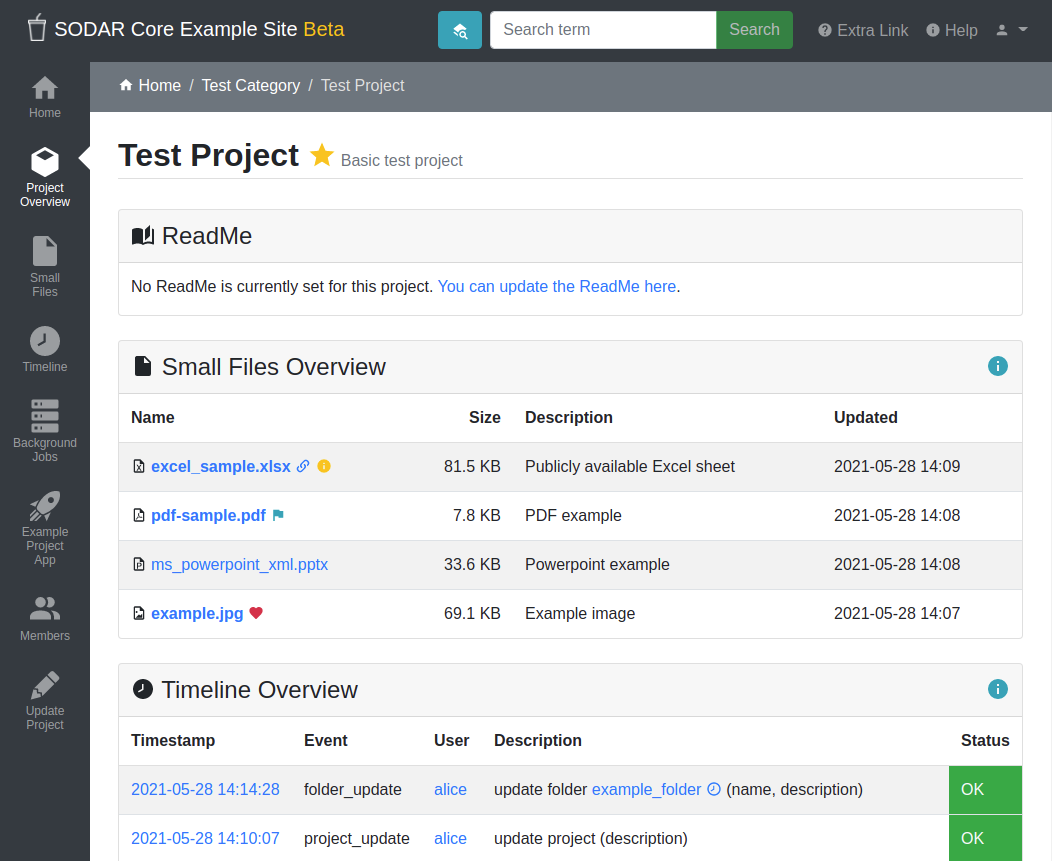
Project detail view
Category and Project Management
In SODAR based sites, data is split into categories and projects. Categories may be freely nested and are used as containers of projects. They may contain a description and readme, but project apps are disabled for categories unless explicitly enabled. Projects can not be nested within each other.
Note
Content displayed on the form varies depending on the type of container (category or project) being edited. E.g. most app settings are only available when creating or updating a project.
Creating a Top Level Category
Currently, only users with a superuser status can create a top level category. This can be done by navigating to the home view and clicking the Create Category link. To create a category, a name and owner must be supplied, along with optional description and/or a readme document. All of these may be modified later.
Note
Currently, only users already previously logged into the system can be added as the owner of a category or project. The ability to invite users not yet on the site as owners will be added later.
Hint
When setting up a new site, think about what kind of category and project structure makes sense for your team and organization. Moving projects and categories under different categories is possible, but is not recommended and can currently only be done via the admin view or directly in the Django shell.
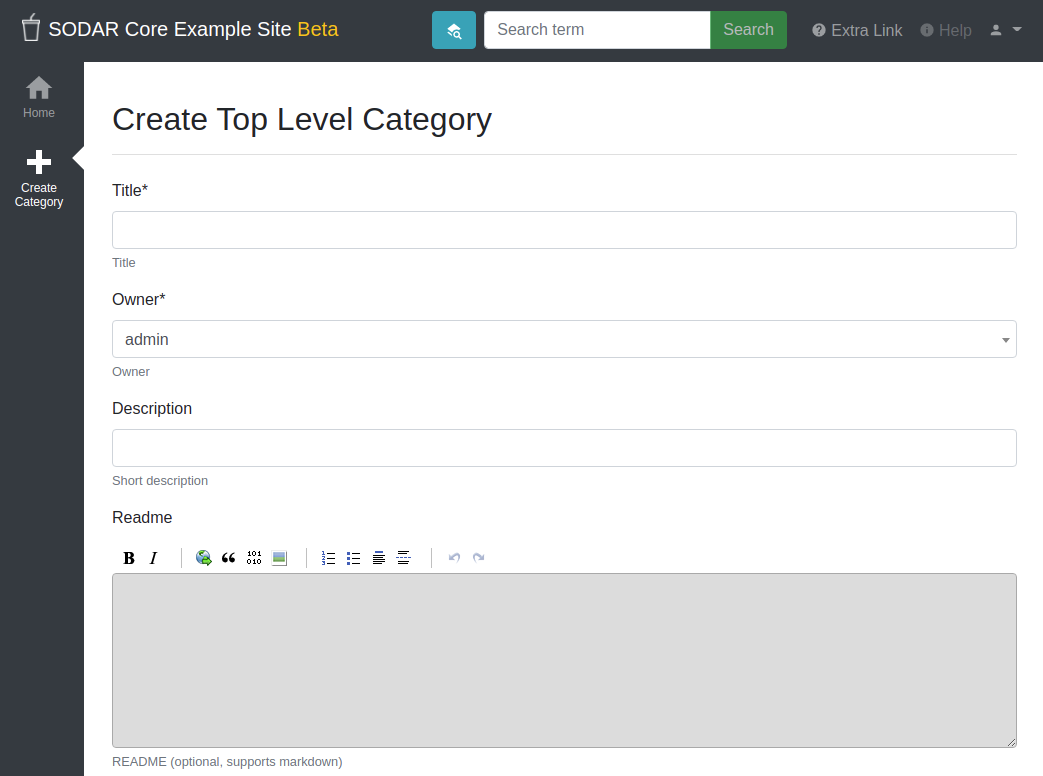
Category/project creation form
Creating Categories and Projects
Once navigating into a category, a user with sufficient access will see the Create Project or Category link in the side bar. This opens up a form for adding a project or a nested category under the current category. The form is identical to top level category creation, except that you can also choose between creating a project or a category.
Users with the role of project contributor or higher in a category are allowed to create a project within that category.
Updating Categories and Projects
An existing project or category can be updated from the
Update Project/Category link in the side bar. Again, a similar form as
before will be presented to the user. The owner can not be changed here, but
must be modified in the Members view instead. It is possible to move
the current category or project under another category by altering the
parent field. The user who does the updating must have a sufficient role in
the target category or superuser status.

Category/project updating form
Note
For remote project synchronized from another SODAR Core based site, you can only edit local application settings in this view.
Public Access
From the project create/update view, setting Public Access will give everyone in the system read-only access in the project. The read-only access level can be chosen between project guest (full read-only access to all data) and project viewer (limited access to basic project information).
Warning
If the site has been configured to allow in anonymous users, this will also make the project available to anyone who can access the site in your network! Please use this feature carefully.
Note
Public access can only be set for projects. Categories will be visible for users with access to any category or project under them.
Top Level Category Public Statistics
It is possible to display category statistics for selected top level categories to all users regardless of their access level. This can be toggled in the category updating view under Display public category statistics.
This will grant the users access to the category details page with only the category readme and statistics visible.
Access on Remote Sites
In the project create/update view, owners and delegates can modify remote site access to projects. This is available for sites where these controls have been enabled by administrators. The sites will appear as checkboxes as Enable project on {SITE-NAME}.
For more information, see Remote Projects.
App Settings
Project and site apps may define app settings, which can be either be set with the scope of project, user or user within a project.
Widgets for project specific settings will show up in the project creation and updating form and can only be modified by users with sufficient project access. User specific settings will be displayed in the Userprofile app.
Certain project app settings may appear only for categories, only for projects or for both container types.
By defining the attribute user_modifiable=False, project or user app
settings will not be shown in the respective project/user update views. This is
used e.g. in cases where a project app provides its own UI or updates some
“hidden” setting due to user actions. Superusers will still see these hidden
settings in the Update Project view.
Settings with the scope of user within a project do not currently have a separate UI of their own. Instead, project apps can produce their own user specific UIs for this functionality if manual user selection is needed.
The projectroles app provides the following built-in app settings with the project scope:
- IP restrict
Restrict project access to the IP allow list if enabled.
- IP allow list
Comma-separated list of allowed IP addresses for project access.
- Block project access
Temporarily block all non-superuser access to project views. This setting is only available for superusers. It is intended for cases where e.g. problems with project data require it to be temporarily made unavailable for users. The setting can also be toggled using the
blockprojectaccessmanagement command.- Display public category statistics
If enabled, display statistics of the category to all users regardless of explicit category access. Only available for top level categories.
To clean up settings which have been stored in the database but have since been removed from the plugin app settings definitions, run the following management command:
$ ./manage.py cleanappsettings
Project Archiving
In the project update view it is possible to archive a project. Clicking the Archive button and confirming this action in the next view will set data modification from project access to read-only. User roles can still be granted, but contributors can no longer edit data in project apps.
The project update view will still be available for owners and delegates for updating basic project metadata. Superusers will be able to edit project data regardless of its archiving status.
To undo archiving, the project can be unarchived from the same button on top of the project update view, now labeled Unarchive.
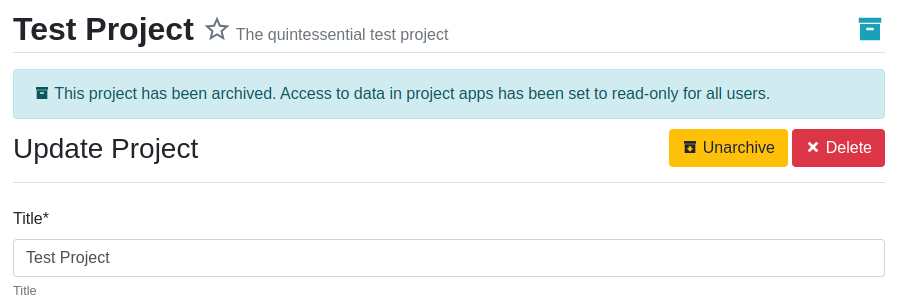
Archived project and unarchive button in project update view
Project Deletion
The option to permanently delete a project is also available for owners and delegates in the project update view. The Delete button is found next to the project archiving button.
Deletion is disabled for categories which have nested child categories or child projects. In such cases, the children must be individually deleted first. This is done deliberately to decrease the chance of accidental deletion of multiple projects.
If remote access for a project has been granted on target sites, access needs to be revoked before the project can be deleted. Similarly, a project on a target site can only be deleted if its access has been revoked on the source site. For more information, see Remote Projects.
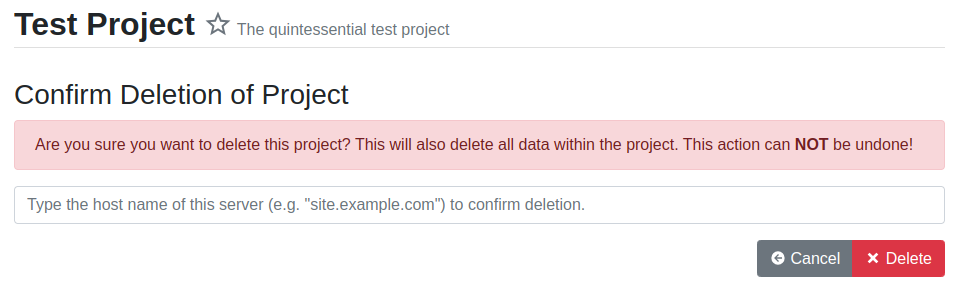
Project deletion confirmation form
Clicking the Delete button will take you to a form for confirming the deletion. You will have to write the host name of the SODAR Core site to confirm the action.
Danger
Deletion will permanently wipe out all data associated with a category or project. This operation can not be undone!
Member Management
Project member roles can be viewed and modified through the Members link on the sidebar. Modification requires a sufficient role in the project or category (owner or delegate) or superuser status.
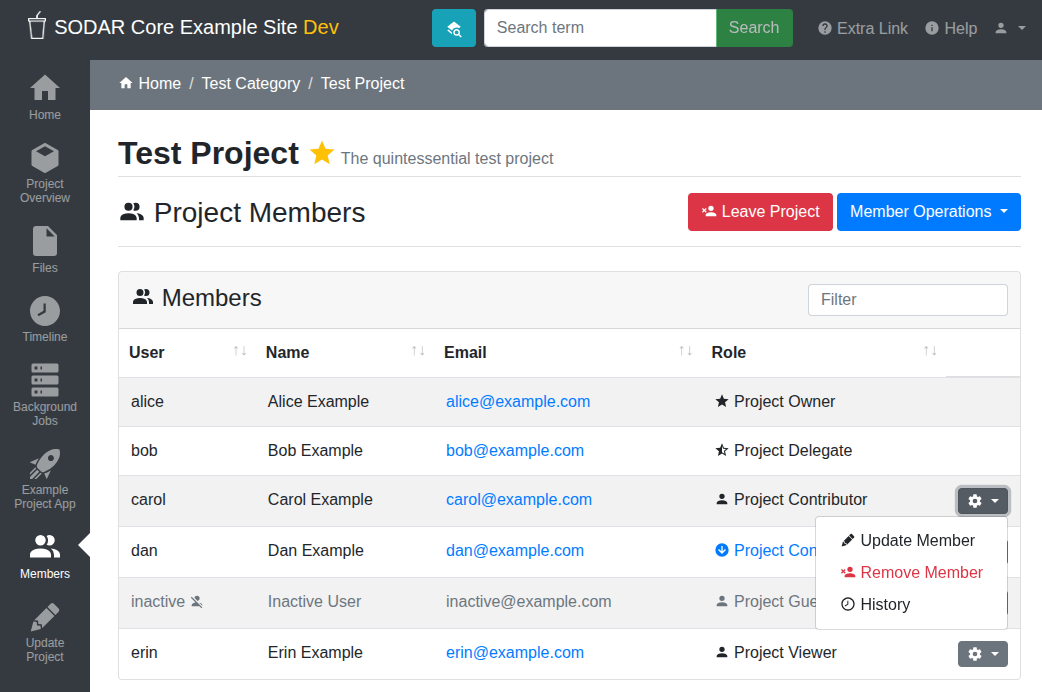
Project member list view
The member table lists all members of the category or project, initially ordered by descending order of role level. The table can be sorted by any column and filtered by typing test into the input box on the top right side of the table.
All members of categories automatically inherit identical access rights to subcategories and projects under those categories. Inherited member roles can be promoted to a higher local role, but demoting to a lesser role for child categories or projects is not allowed.
For inherited members, the member list displays a link to the category where the inheritance is derived from. Inherited members can not be removed or edited locally, with the exception of promoting a user to a higher role.
Adding Members
There are two ways to add new members to a project or a category:
Add Member is used to add member roles to system users.
Send Invite is used to send email invites to users not yet registered in the system.
Addition or modification of users sends an email notification to the user in question if email sending is enabled on your Django server. The emails can be previewed in corresponding forms.
Hint
It is also possible to create an invite in the Add Member form. Inviting is enabled when inputting an email address not found among the system users.
Modifying Members
Changing or removing user roles can be done from links next to each role on the member list. Category or project ownership can be transferred to another user who currently has a role in the project by using the dropdown next to the owner role.
Invites
Invites are accepted by the responding user clicking on a link supplied in their invite email. Depending on how the site is configured, users can then either login to the site using their LDAP/OIDC credentials or create a local user. The latter is only allowed if local users are enabled in the site’s Django settings and the user email domain is not associated with configured LDAP domains. Invites expire after a certain time and can be reissued or revoked on the Project Invites page.
Note
Inviting a user is prohibited if they already have an active invite in a parent category of the current category or project.
Leaving a Project
A user may leave a category or project by clicking the Leave Category or Leave Project button in the role list view. Leaving a category will also remove the user’s access to child categories and projects, except for cases where another role has specifically been assigned for them in children.
This operation can not be undone. To regain access, an owner or a delegate must re-add the user to the category or project.
Owners are not able to directly leave a project. Instead, the owner role must be transferred to another user. To do this, the user must select Transfer Ownership in their role dropdown.
Batch Member Modifications
Batch member updates can be done either by using REST API views with appropriate
project permissions, or by a site admin using the batchupdateroles
management command. The latter supports multiple projects in one batch. It is
also able to send invites to users who have not yet signed up on the site.
Remove All Roles from User
To easily remove all roles from a user, use the removeroles management
command. For owner roles, you can supply the user name of a user for whom to
transfer those roles. If no owner is supplied, each ownership will be
transferred to the parent category owner. Example:
$ ./manage.py removeroles --user alice --owner bob
User Status Checking
An administrator can check status of external LDAP user accounts using the
checkusers management command. This will list accounts disabled or locked
out of the LDAP server. Use the -h flag to see additional options.
$ ./manage.py checkusers
Site App Settings
Site-wide app settings, which are not tied to any project or user, can be altered by administrators by opening the Site App Settings view from their user dropdown. The form works similarly to the project app settings in the project creation and updating view.
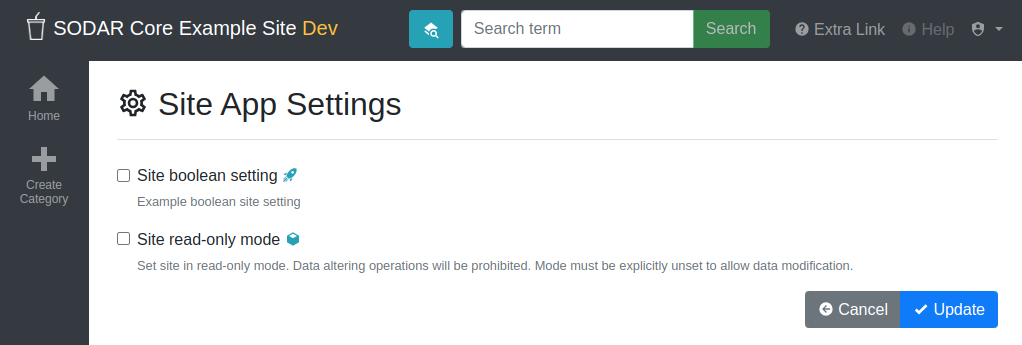
Site app settings view
Site Read-Only Mode
In Site App Settings, an administrator can temporarily set the site to read-only mode. When this mode is enabled, all data on the site is only accessible for reading. No project or user data should be modifiable. Once enabled, the mode must be explicitly disabled from the same form.
While the mode is active, an alert will be displayed to all users that site data can currently not be modified.
Once the mode has been disabled, the alert on existing browser views will be changed into one prompting the user to reload the current view. Reloading ensures all the UI elements are active in case not everything is updated on the client side.
Remote Projects
It is possible to sync project metadata and member roles between multiple SODAR Core based Django sites. Remote sites and access can be managed in the Remote Site Access site app, found in the user dropdown menu in the top navigation bar.
Alternatively, remote sites can be created using the following management command:
$ ./manage.py addremotesite
In the current implementation, your django site must either be in source or target mode. A source site can define one or multiple target sites where project data can be provided. A target site can define exactly one source site, from which project data can be retrieved from.
To enable remote project data and member synchronization, you must first set up either a target or a source site depending on the role of your own SODAR Core based site.
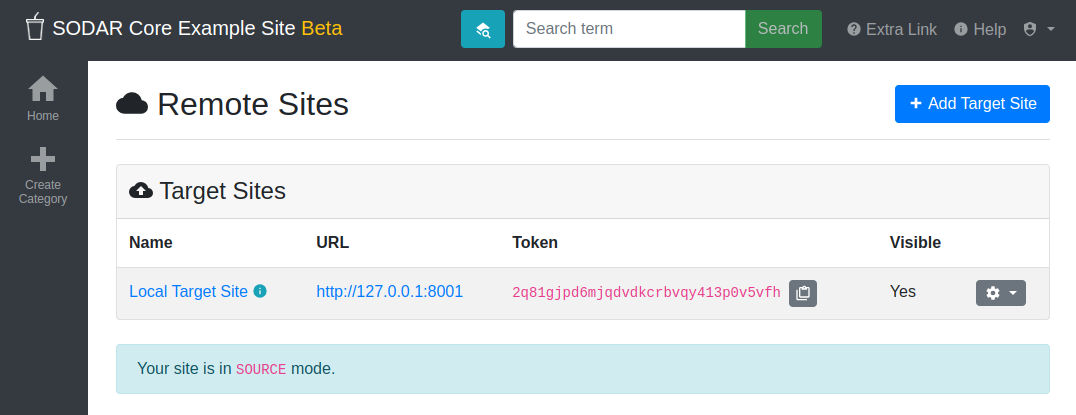
Remote site list in source mode
As Source Site
Navigate to the Remote Site Access site app and click on the Add Target Site button. You will be directed to a form for specifying the remote site. A secret string is generated automatically. You need to provide this to the administrator of the target site in question for accessing your site.
Fields for target remote site creation:
- Name
Name of the remote site.
- URL
URL for the remote site, e.g.
https://sodar-core-site.example.com.- Description
Text description for the site.
- User display
If set false, this will hide the remote project links from your users. Users viewing the project on the source site then won’t see a link to the target site. Owners and superusers will still see the link (greyed out). This is most commonly used for internal test sites which only needs to be used by admins.
- Owner modifiable
If this and User display are checked, owners and delegates can control project visibility on this site in the project create/update view.
- Secret
Secret token for the project, which must be set to an identical value between source and target sites.
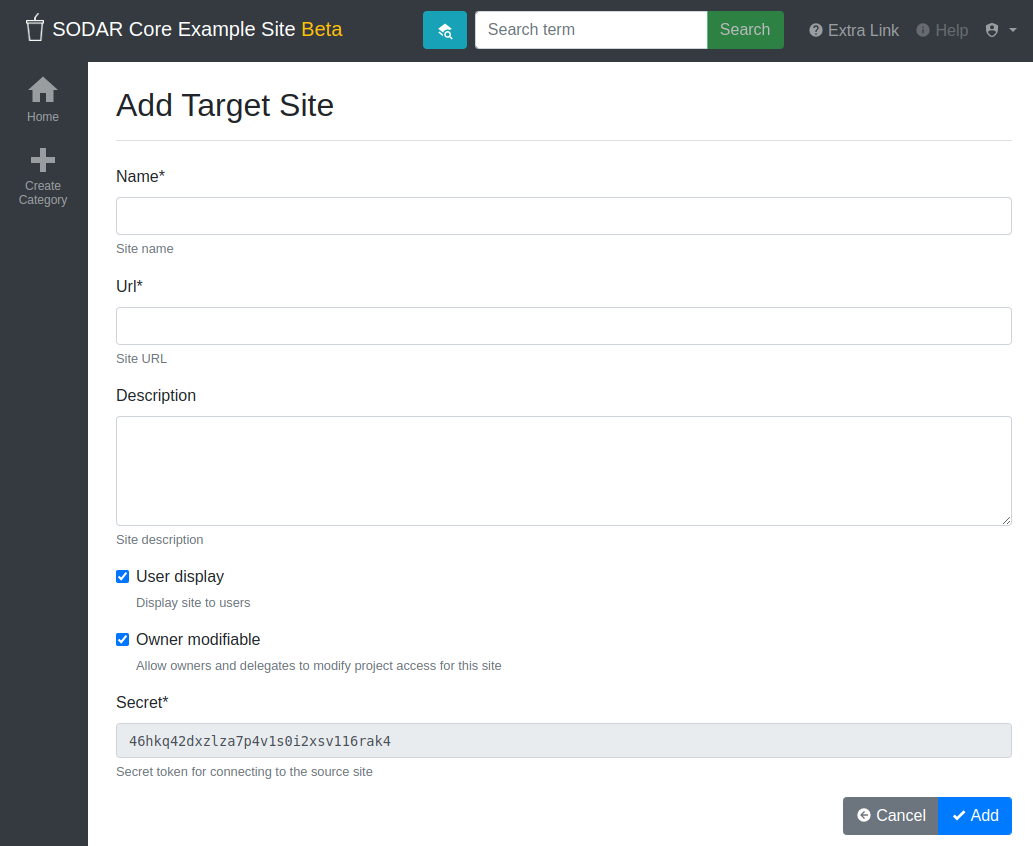
Remote site create/update view viewed as a source site
Once created, you can access the list of projects on your site in regards to the created target site. For each project, you may select an access level, of which three are currently implemented:
- No Access
No access on the remote site (default).
- Read Roles
This allows for the target site to read project metadata and user roles in order to synchronize project access remotely.
- Revoked Access
Previously available access which has been revoked. The project will still remain in the target site, but only superusers, the project owner or the project delegate(s) can access it.
Once desired access to specific projects has been granted and confirmed, the target site will sync the data by sending a request to the source site.
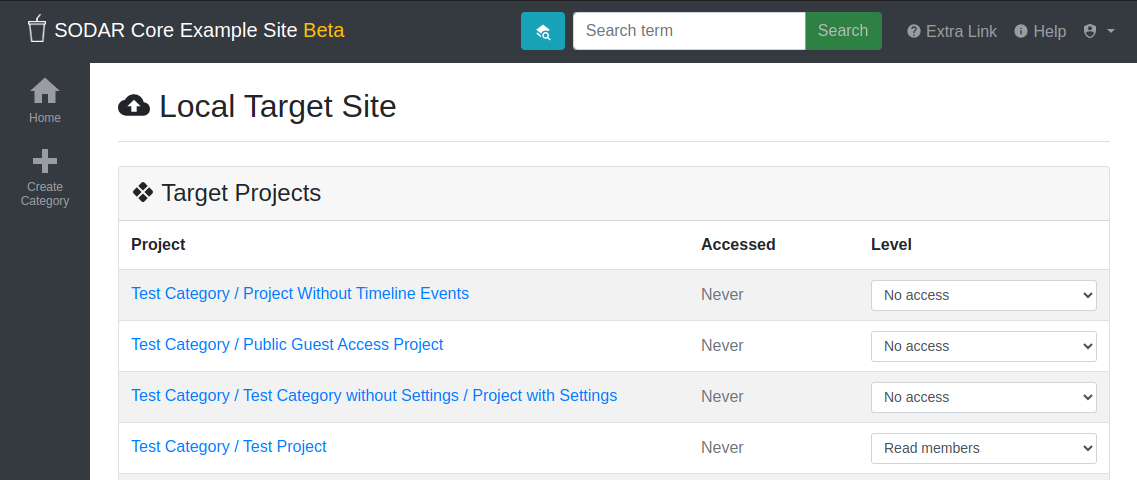
Remote project list viewed as a source site
Note
The read roles access level also provides metadata of the categories above the selected project so that the project structure can be maintained.
Note
Only LDAP/AD user roles and local administrator owner roles are provided to the target site. Other local user roles are ignored.
Note
Access levels for purely checking the existence of the project and only reading project metadata (title, description..) without member roles are implemented in the data model and backend, but currently disabled in the UI.
Note
If synchronizing a project with public access enabled, this setting is not automatically set on the target site. If you wish to make the project also publicly accessible, it needs to be explicitly set by the project owner, delegate or a superuser in the Update Project form on the target site.
As Target Site
The source site should be set up as above by cllicking on the Set Source Site button and filling out the corresponding form. Use the secret string provided by the source site as the access token.
After creating the source site, remote project metadata and member roles can be retrieve the Synchronize option in the site dropdown found in the Remote Sites view on the target site. Additionally, if the remote source site is synchronized with multiple target Sites, information about those other target sites will be synchronized as well an displayed as Peer Sites.
To set up automated project and member sync from the source site, you will need
to run a Celery worker with Celerybeat enable. Then, set the Django setting
PROJECTROLES_TARGET_SYNC_ENABLE to True and optionally set the value for
PROJECTROLES_TARGET_SYNC_INTERVAL. For more information, see
Projectroles Django Settings.
Alternatively, the following management command can be used:
$ ./manage.py syncremote
Note
Creating local projects under a category synchronized from a remote source site is not allowed. For having local projects on a target site, you should create and use a local root category.
Note
If a local user is the owner of a synchronized project on the source site,
the user defined in the PROJECTROLES_DEFAULT_ADMIN will be given the
owner role. Hence you must have this setting defined if you are
implementing a SODAR Core based site in target mode.
Note
Local non-owner users can be granted roles if
PROJECTROLES_ALLOW_LOCAL_USERS is set on the target site. However, local
users must be manually created by a target site admin in order for their
data and roles to be synchronized.
Project Detail View Links
Links to the same project on other sites will appear in the Project on Other Sites card in the project detail view. If the remote site has not yet synchronized this project, the link will appear grayed out and unclickable. On a remote site, the source project will be labeled as such.
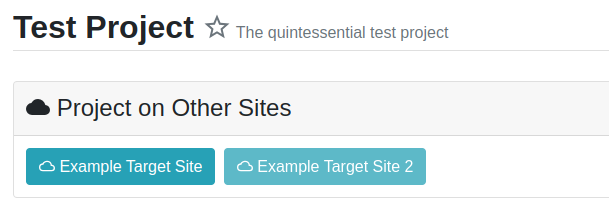
Remote project links in the project detail view
Search
The basic search form is displayed in the top navigation bar if enabled. It
takes one string as a search parameter, followed by optional keyword argument.
At this time, the keyword of type has been implemented, used to limit the
search to a certain data type as specified in app plugins.
Left to the basic search form is a link to the Advanced Search page, where you can currently search for items using multiple search terms combined with the OR operator.
Search results are split into results from different apps. For example, entering
test will return all objects from all apps containing this string.
Alternatively, entering test type:project will provide results from any app
configured to produce results of type project. By default, this will result in
the projectroles app listing projects which contain the search string in their
name and/or description.
Note
Additional features such as full-text search and more keywords/operators will be defined in the future.
REST API
Many SODAR Core features are also available via a REST API. See Projectroles REST API Documentation for instructions on REST API usage.