Timeline Usage
Usage instructions for the timeline app are detailed in this document.
Timeline UI
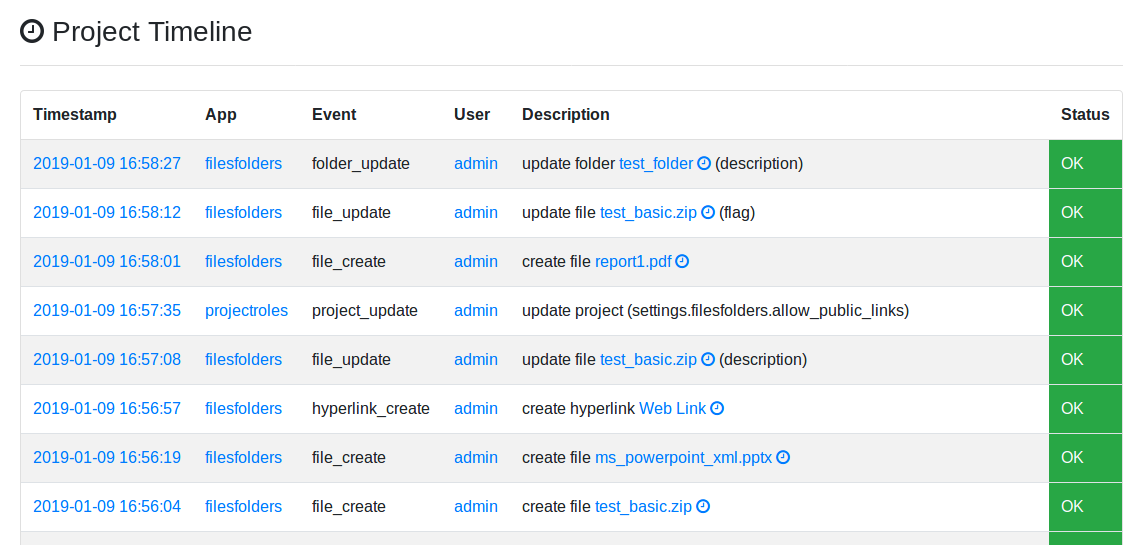
You can browse events logged for each project by navigating to the project and selecting the “Timeline” app from the project sidebar.
By clicking on the time stamp for each event, you can see details of the event execution (in case of e.g. asynchronous events).
By clicking on the clock icon next to an object link in the event description, you can view the event history of that object. The link itself will take you to the relevant view for the object on your Django site.
Certain events have a file icon in their description. If clicked, a popup showing a collection of extra data for the given event will appear. It will show the extra data of the event itself and of the different states the event went through, if there are any.
Admin users are able to see certain “classified” level events hidden from normal users.
Timeline event list view
Backend API for Event Logging
The API for logging events is located in timeline.api. For the full API
documentation, see here.
Invoking the API
The API is accessed through a backend plugin. This means you can write calls to the API without any hard-coded imports and your code should work even if the timeline app has not been installed on the site.
The most common use case is to save events within the Class-Based Views of your Django site, but technically this can be done by any part of the code in your Django apps.
Initialize the API using projectroles.plugins.get_backend_api() as follows:
from projectroles.plugins import get_backend_api
timeline = get_backend_api('timeline_backend')

if timeline:    # Only proceed if the backend was successfully initialized
    pass        # Save your events here..
Adding an Event
Once you can access the timeline backend, add the event with
timeline.add_event(). A minimal example is as follows:
tl_event = timeline.add_event(
    project=project,            # Project object
    app_name=APP_NAME,          # Name of the current app
    user=request.user,          # The user triggering the activity being saved
    event_name='some_event',    # You can define these yourself, not unique
    description='Description')  # Human readable description
Linking an Object
Say you want to link a Django model object to the event for tracking its
history? In this example, let’s say it’s a SODAR Core compatible User model
object user_obj.
Note
The given object must contain an sodar_uuid field with an
auto-generated UUID. For more information, see the
project app development document.
Create the event as in the previous section, but add a label target_user in
the description. The name of the label is arbitrary:
tl_event = timeline.add_event(
    project=project,
    app_name=APP_NAME,
    user=request.user,
    event_name='some_event',
    description='Do something to {target_user}')
All you have to do is add an object reference to the created event:
obj_ref = tl_event.add_object(
    obj=user_obj,
    label='target_user',
    name=user_obj.username)
The name field specifies which name the object will be referred to when
displaying the event description to a user.
Defining Object References
The example before is all fine and good for a User object, but what about
your own custom Django model?
When encountering an unknown object model from your app, timeline will call the
get_object_link() function in the ProjectAppPlugin defined for your app.
Make sure to implement it for all the relevant models in your app.
Displaying Object Links
In order to display object links with timeline history link included, you can
use the timeline.api.get_object_link() function in your app’s template tags.
Defining Status States
Note
If your Django apps only deal with normal synchronous requests, you don’t need to pay attention to this functionality right now.
By default, timeline.add_event() treats events as synchronous and
automatically saves them with the status of OK. However, in case of e.g.
asynchronous requests, you can alter this by setting the status_type and
(optionally) status_desc types upon creation.
tl_event = timeline.add_event(
    project=project,
    app_name=APP_NAME,
    user=request.user,
    event_name='some_event',
    description='Description',
    status_type='SUBMIT',
    status_desc='Just submitted this')
After that, you can add new status states for the event using the object
returned by timeline.add_event():
tl_event.set_status('OK', 'Submission was successful!')
Currently supported status types are listed below, some only applicable to async events:
OK: All OK, event successfully performedINFO: Used for events which do not change anything, e.g. viewing something within an appINIT: Initializing the event in progressSUBMIT: Event submitted asynchronouslyFAILED: Asynchronous event submission failedCANCEL: Event cancelled
Extra Data
Extra data can be added in the JSON format for both events and their status
states with the extra_data and status_extra_data parameters.
Speciying a label {extra-NAME} in the event description will lead to a
callback to get_extra_data_link() in the app plugin. To support this you
need to make sure to implement the get_extra_data_link() function in your
plugin.
Classified Events
To mark an event “classified”, that is, restricting its visibility to project
owners and admins, set the classified argument to true when invoking
timeline.add_event().
Note
Multiple levels of classification may be introduced to the timeline event model in the future.